
Whenever I’m doing a renovation I like to consider adding more outlets and more lights. It’s so much easier when the walls are open and you can run wiring, but you don’t always have that luxury. Recessed lights, one of my favorite fixtures, can actually be quite simple to install, even if the ceiling isn’t opened up. For our current project, I wanted to add a couple recessed lights to the kitchen.
I like to use a 5″ recessed fixture. They sell one at Home Depot for under $10 and that includes the trim, can, and everything you need to install it. Plus, it will work with an ordinary 60-watt bulb. They’re very compact and can be installed in a drywall ceiling without tearing out extra drywall that will need to be patched.
Sometimes the hardest part is deciding where to put them. It’s always good to try for symmetrical placement centered along doorways or windows, etc. Aside from that, you want to figure out where the ceiling joists are and try to center the light between them.
 With that decided, mark the locations. The manufacturer provides a template to trace around so that you can cut a hole that is the exact size needed. Try not to make it any larger than the paper template. I usually start the hole with a spade bit and then finish it with a jig saw. Try not to cut very deep to stay away from any hidden wires or pipes. (Think before you cut…
One way or another you’ll need to get a wire through the ceiling and to the hole. This is simple if you have an attic. In our case, we were only two joists from a larger hole so we bought a long drill bit with an extension that made it around 20″ long. We drilled the hole and were able to fish the wire to where the lights would be.
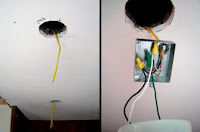
All the wiring happens in a small box on top of the light can. First, punch out the metal tab and put in a 3/8″ Romex connector. (This is a metal clamp that will keep the wire from moving from it’s position.) The wire goes through this connector then you can tighten it down.
 The connections are just like any basic light fixture. The wires all fit in the small metal box which is screwed down and attached to the top.
Now, you can put the metal “feet” on the can that will slide out once it’s in the ceiling and press against the drywall. Small metal tabs attach the the front lip of the can. These will keep the edge flush with the drywall and form a “sandwhich” with the feet making it stay in place. The trim is attached by hooking the springs in the can.
Add a bulb and you’re done. It’s cheap and easy and very effective when you want to add some light to a room.
-Peter


