
A common project on many people’s wish list is to open up their kitchen by removing a wall, or at least making an opening in a wall. That’s the goal at my current project where I will be removing much of the wall between a kitchen and dining room, installing a beautiful wood serving counter that will be the new centerpiece for this entertaining space.
 Today was demolition day. Maybe I should say careful demolition. The trick with this project is to keep the mess to a minimum and reduce the amount of drywall repairs to make as well.
So, how do you widen a doorway? This home was only a couple years old, so it will make a great candidate to cover the basic steps to the process.
IMPORTANT NOTE: This is a NON-Load bearing wall.
1. Carefully remove trim. Once again, carefully. Much of the casing from the old door will be reused around the new, wider opening so I want to carefully save as much as possible. See this post to learn how to not ruin every piece as you remove it.
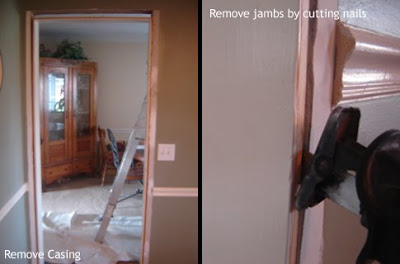
2. After the trim is off, I removed the door jamb. It’s often easiest to cut the nails around a door jamb with a reciprocal saw. Then, the jamb comes out as one unit that you can disassemble. If you just start prying on it you’re more likely to damage it. I’ll need those pieces later and boards aren’t cheap these days!
3. Think, then remove drywall. Thinking this all the way through will save you time and suffering from cutting something you shouldn’t. My new header will be at the same height as the old one, except extend all the way across the room. The header will be 2×6, so I added 5 1/2″ to the height of the cripple stud, marked a level line and cut all the way across on one side.
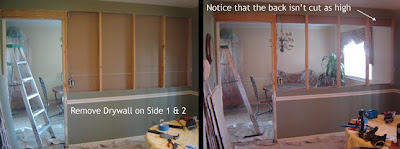
I will need to slide the header in from one side, but the drywall on the back can stay intact. If I can keep from damaging it, that will save me some work down the line. I used my little drywall saw for most of these cuts because power tools make so much more dust.
Before pulling drywall off, score the corners with a utility knife and cut around the perimeter with a hand saw or reciprocal saw. Then you can pull the drywall off in pieces.
4. Move any electrical. With the drywall removed I can easily see any wiring that needs to be dealt with. This home was fairly easy in that there was only a couple light switches and all the wires ran up to the attic. I was able to put a junction box in the attic where I could extend the wires enough to reach new switches on an adjacent wall.
Next we start removing lumber. I’ll cover that tomorrow…
-Peter


