 The kitchen is a place that tends to be the central hub of the home. It’s also a place where we keep lots of stuff. Think about it- hundreds of items from pots to potatos. Keeping everything handy and organized can be a chore. Let me give you two things that will help.
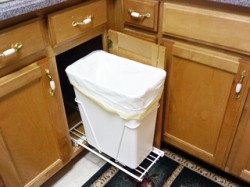
1. GET A PULL-OUT TRASH CAN
For most of us, the trash can sits in a corner of the room, next to the fridge or somewhere near the back door, etc. We don’t really care to look at it or share it with every guest that comes over, but what else are we going to do with it?
Put it in a cabinet.
 For around $40 you can buy a nice pull out 30 quart trash can that easily mounts in your cabinet. Yes, I said easily. If you can drive a few screws, you can install this. The main thing is to measure the cabinet to make sure it’s big enough. Beyond that, the hardware comes fully assembled and is fastened to the bottom of your cabinet with four screws. That’s it!
I just installed one for a client who used to have the trash can in the middle of the room, floating around to stay out of her way. She was glad to hide it and have it close to her sink in this cabinet.
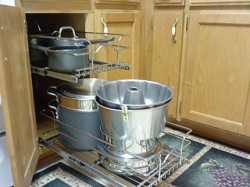
 2. ADD SOME PULL OUT TRAYS
For many people, the bottom sections of the cabinets are hard to reach, especially toward the back where things tend to get forgotten and lost forever. Here’s the solution: get a pull-out tray.
There are many varieties and sizes, but the one I installed recently was a double stainless steel wire basket type. Each basket rested on heavy duty slides with ball bearings and are attached to a large supporting bracket that is mounted on the floor.
These were only slightly more difficult to put together. You basically assemble the frame and screw it to the floor just like the trash can. It also has a bracket that can be screwed to the back of the cabinet to stablize the entire thing. The beautiful part is that it doesn’t have to be connected to the sides at all. This helps because you don’t have to modify or build out the sides in order to attach any hardware.
One of the more difficult things you might run into is how to remove the shelf that you probably have in your lower cabinets. At this project, the shelf was fairly light-duty and removed with a few well-placed blows of the hammer. If yours is less willing to cooperate you might try cutting the shelf in the middle and then you can wiggle it around and pry it out. The more drastic method might be to cut around the perimeter of the shelf with a multi-tool or even a reciprocal saw (NOT recommended). You might want to put down some tape or something to protect the cabinet before you get out the power tools. A scratch in finished wood is not a good thing.
REV-A-SHELF
Both of these kitchen accessories are made by a company called Rev-A-Shelf. We got ours at Lowe’s, but from what I can tell, Rev-A-Shelf has the corner on the kitchen organizer market. If you can think it up, they probably make it! Check out their webiste to see what I mean.


