 When remodeling older homes, I always prefer to make the new parts look old.
At a recent project, the kitchen had been renovated years ago and they used all the best that the 1970’s had to offer- but this was a Tudor-inspired home from the 1940’s! Please don’t do this.
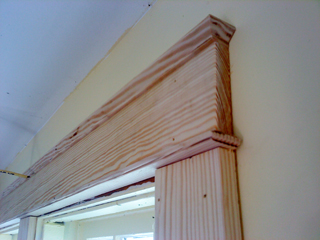
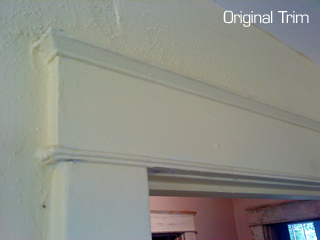
It may take a little more time and money to do it right, but it may not be as hard as you think. For example, I had to recreate all the trim in the kitchen to match the old casings. The original trim is very common among homes in our neighborhoods from the 1920’s through the 1940’s. However, if you wanted to buy this trim today you’d have to get it custom made from a shop that specializes in mill-work and mouldings.
Or you could do it yourself.
It’s fairly high on the carpentry skill continuum, but it’s a fun project if you like a challenge. The idea is to buy stock pieces that you can rip down to the right size with your table saw.
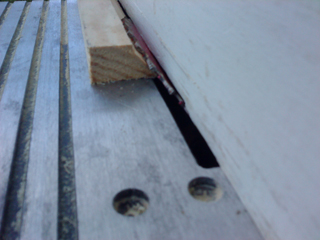
 The head casing (the piece across the top) is actually made up of three pieces that are nailed together before it’s nailed to the wall. This is the most difficult part of my project. The very top piece was partially cut at an angle, including the ends as you can see in the pictures. I made a couple straight cuts to rip a pine 1×2 to the right size before ripping a portion of the front corner off with my table saw at a 30 degree angle. Instead of cutting all the way through, I stopped just short, which left the small lip at the top. It took some experimenting to get it to match the old pieces, but once I had it figured out, it was fairly simple to mass produce these pieces to do all the doorways and windows.
 Cutting the angle on the ends meant sliding the piece vertically through the table saw. I attached an extra board to my rip fence so that it would stand a little higher and I hold the piece steady and keep my hands further away from the hungy blade. It probably wasn’t how Norm Abram would do it, but we all start somewhere.
To make the smaller piece on the bottom I first ripped some pine to the right general size and then ripped the two corners off, trying to match the original. To make it perfect, you’d probably need to get the router table out. After making the cuts I used a sander to round off all the edges and it was a decent match for the old piece.
Once the pieces were cut it took quite a bit of sanding to get all the saw marks sanded out. This isn’t such a big deal if you are painting, however, if you’re planning to stain, make sure you sand it well or it will show lots of marks from where you ripped it.


