My last article was a little depressing because I covered all the faults of this shower that was failing after only 5 years of life. Let’s put that in the past and start putting the shower back together using a system to waterproof the shower and make sure the water goes down the drain instead of reaching the crawlspace.
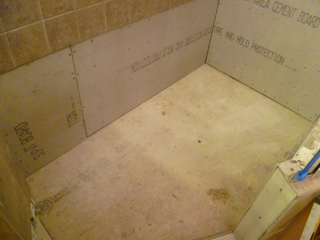 With a leaky shower, I generally keep digging through layers of damaged tile, flooring and framing until I find something solid. In this case, the engineered I-beam floor joists were in fine shape, but the subfloor of the old shower had to go.
The subfloor is the level piece of plywood that was under the old pvc liner. I cut it out and put in some extra blocking and nailers so that I could install two sheets of new 3/4″ Home Advantage or Advantech subflooring. This is a superior-grade product with built-in moisture resistance. I installed 1/2″ Hardibacker cementboard on the walls.
THE KERDI SYSTEM
Kerdi is a waterproofing product from a company called Schluter Systems. It’s kind of a large fabric that is set in a thin layer of mortar and overlapped at any seam. The mortar joins with the Kerdi membrane to make a mechanical coupling. The Kerdi drain also has a large flange that is bonded to the membrane.
INSTALL THE SLOPED FLOOR
 Before installing the Kerdi I needed to installed a sloped floor. I began with the foam pre-sloped tray provided in the Kerdi shower kit, but this wasn’t large enough for this shower which was over 70″ long. In this case I set the tray first and then I have to use dry pack decking mortar (i.e. CustomFloat bedding mortar) to extend the slope for the rest of the distance. This mortar contains a lot of sand and is fairly easy to work with. You have to pack it into the cavity and use some sort of scrap board as a reference to make sure you get the desired slope of 1/4″ rise per foot to ensure that water drains correctly and doesn’t pool anywhere.
INSTALL THE KERDI MEMBRANE
After the floor sets up overnight I can install the Kerdi. I start by installing the inside corner pieces. These specialty pieces are included in the shower kit or you can buy them individually at places like Louisville Tile. I spread unmodified thinset mortar in the corners using a 1/4″ x 3/16″ V-notched trowel. It’s best to mix it so it is fairly fluid so that you can set the membrane into it and trowel out any extra. If it’s too dry you’ll get frustrated quickly and your Kerdi seams will be humps in the tile later.
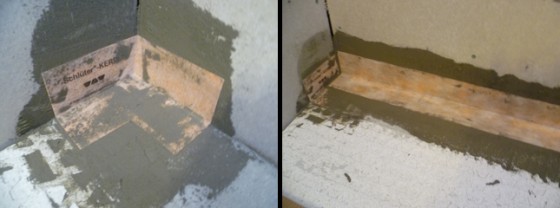
![]() With the corners done, I did all the wall intersections using Kerdi-band which is just a long strip of Kerdi cut to around 5″ wide. The large sheets for the walls come next, making sure to overlap at all the corners by at least 2″. This can be the messy part. You want to work fast so the Kerdi sets in the mortar and it’s easy to get sloppy, especially if your mortar is fairly fluid as we discussed earlier. You can use a drywall hawk to catch falling mortar or just trowel it up off the shower floor after you get the wall done.
With the corners done, I did all the wall intersections using Kerdi-band which is just a long strip of Kerdi cut to around 5″ wide. The large sheets for the walls come next, making sure to overlap at all the corners by at least 2″. This can be the messy part. You want to work fast so the Kerdi sets in the mortar and it’s easy to get sloppy, especially if your mortar is fairly fluid as we discussed earlier. You can use a drywall hawk to catch falling mortar or just trowel it up off the shower floor after you get the wall done.
SET THE KERDI DRAIN AND FINISH THE FLOOR
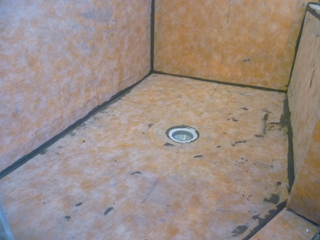
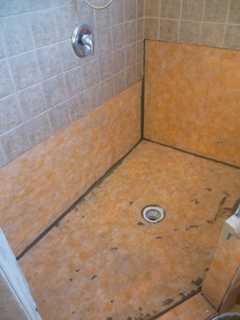 The floor is last and before the Kerdi goes down, the drain must be set. I have easy access to the plumbing from below so the drain is easily set on mortar into the recessed area in the pre-sloped foam base. There is some wiggle room, so I usually check my measurements to make sure the drain is in the right place, usually centered between the walls. After the drain is set, a piece of Kerdi is installed over the entire floor with the mortar bonding it to the drain and corner pieces making a complete shower ‘envelope’ that is completely waterproof and vaporproof.
I let the Kerdi set up overnight while I dream of installing tile. That’s coming next!




Myron L
October 31, 2012 , 8:19 pm
Peter Bales
October 31, 2012 , 8:44 pm