 It seems that we continue to change how we use our kitchens. The old trend was to make the kitchen separate from the rest of the home, supposedly so the food preparation mess was hidden from guests, but lately the trend is to incorporate the kitchen into the rest of the living area, with barely a wall to divide them.
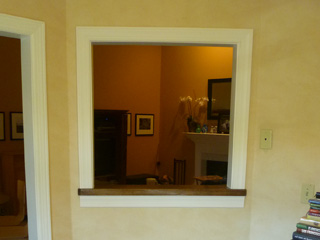
This kitchen at a large condo in Green Hills fell into the first category and was completely walled off from the rest of the adjacent living area. The homeowners didn’t want to do anything major, but they desperately wanted to open up their kitchen space. This was the perfect time to install a “pass through” in the kitchen wall.
A pass through can be about any size that is appropriate to the space. For this kitchen, I wanted to match the top to the height of the homes doorways so that this was a consistant element of the homes design. The countertop would be around bar height which I’d say is around 6″ higher than the standard kitchen counters, or around 42″. The width needed to be as wide as possible within the small wall I had to work with. The resulting finished opening would be around 36″ wide by 36″ tall.
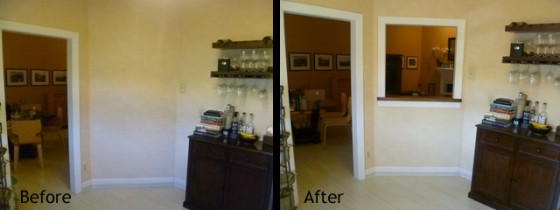
You can see in the before and after pictures what a dramatic change this makes- and that’s just from how it looks. It also adds function to the home, from being a serving bar to letting the homeowner see the TV in the living room or keep an eye on the kids.
In this case the wall was NOT load-bearing which helps keep it simple. I started by removing the drywall on the kitchen side where I had made a sort of ‘tent’ out of plastic with ZipWall poles. This helps contain the dust. It’s important to plan everything out and think twice before you cut something. In this case, I was able to do the entire job without doing any drywall patching. Trim covered all the edges.
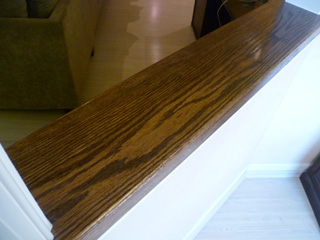
 I made the countertop beforehand so the stain could dry. I purchased a rough 4′ slab of red oak that was around 7 1/2″ wide and 1 3/4″ thick at a place called Mimm’s Lumber over at 1955 Nolensville Pike. They’ve got a nice variety of wood for various woodworking projects. I then took the wood to my friend Chris at Barber Woodworking to have him plane it down so it was smooth and square.
To finish the counter I first cut it to length. It is important to note how the countertop is actually several inches wider than the opening. It looks best if it actually extends underneath the casing like you’d expect a window sill to do. You have to consider this before you cut it. I rounded the corners off a little and used the router to soften the edges as well. Then it all got a good sanding before getting stained. I don’t do a lot of woodworking, but it is really fun to see the beauty in a piece of wood come out when you finish it well. It turned into a fabulous countertop!
There are many ways to open up your space, but you don’t always have to knock down a wall to get there.


Kevin Stanley
November 29, 2011 , 8:11 am
Peter Bales
November 29, 2011 , 8:53 pm
Kevin Stanley
December 7, 2011 , 12:07 pm