 A common design element to consider with a tile shower is storage. Do you want to keep your shampoos on a rack hanging from the shower head or do something more integrated into the tile? There are various shelves that can be attached on the surface of the wall, like corner shelves or soap dishes, but often I’ll build the shelf recessed into the wall. These are also called a niche.
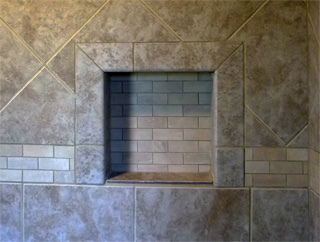
You have to plan for a niche ahead of time, often thinking about where you have an open space within the wall where it can fit. You may also want to frame the wall with some large openings for the niche, or place the studs so that the niche is centered or symmetrical with another niche. You can even plan how it might fit into the tile layout. This takes some careful calculations, but it’s so nice when the grout lines line up nicely with the niches.
A niche can be framed with blocking and covered with drywall or cementboard. There are also companies that make pre-formed niches that are already waterproofed. One popular line of products caled Noble Niches come in various sizes and are easy to install. The only problem is that they often cost $65 or more and can be hard to get, especially if you don’t have time to special order it.
Another way, and the subject of this post, is to make the niche yourself using Kerdi-board. Kerdi-board is a foam substrate product from Schluter Systems that has the Kerdi waterproofing membrane on both sides of it. Kerdi is the same product that I use to waterproof the showers. The advantage to using Kerdi-board to build a niche is that you can cut through one side of the membrane and then fold the flaps together to form the niche. It just takes some careful measuring to get it right.
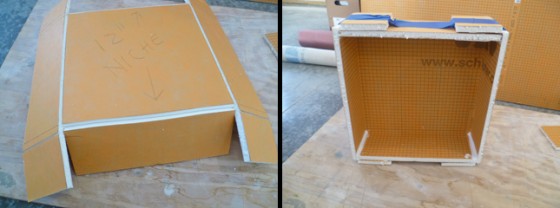
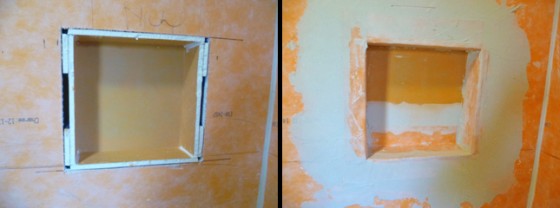
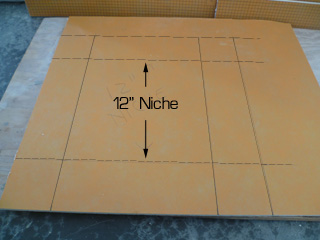 You can see in this picture my basic cut lines for the niche. The goal was to end up with a 12″ square niche that was 4″ deep. The depth equals the width of the studs plus 1/2″ for the drywall. The Kerdi-board is also 1/2″ thick so consider that when laying out your lines and cutting the flaps. The picture below shows how the box came together. I used Kerdi-fix (a sticky caulk sealant) to hold the corners together, but taped them while it set up.
There is some debate among tile installers about how waterproof a niche made in this way is. You can read all about it in the John Bridge forums here. They get into a rousing discussion of the best way to make these niches, etc. The Kerdi-board is definitely strong enough to build a niche. As far as waterproofing, I went ahead and used Kerdi-band on the corners to make extra certain that it wouldn’t leak. The only real concern are the places where the flaps come together so that’s where I added extra Kerdi-band.
My favorite part about using this as a niche (or the Noble Niches for that matter), is how easy they are to install. Once you have the niche built, THEN go to the wall and cut a hole that is the exact size of the niche. For this shower, I had drywall on the walls and had already installed the Kerdi waterproofing over the top. I actually waited to install the niche until I had started tiling. That way, I knew exactly where the grout lines would end up and could place my niche accordingly.
After the hole is cut for the niche, I apply a little thin-set mortar or even silicone caulk to the back and slide it in. I press the back firmly against the drywall that is on the back of the hole. This will fix it all into place permanently. The flaps are all flush with the surface of the wall and doesn’t need any additional blocking to support it. It is totally supported by the flaps and the back adhering to the drywall. This saves a lot of framing ahead of time for the niche and allows some flexibility in placing it with the tile layout.
It may take a little trial and error to cut the flaps correctly, but I’ve found this to be an easier way to end up with a great custom niche whenever I’ve got Kerdi-board on hand. Read more about this shower project here.

