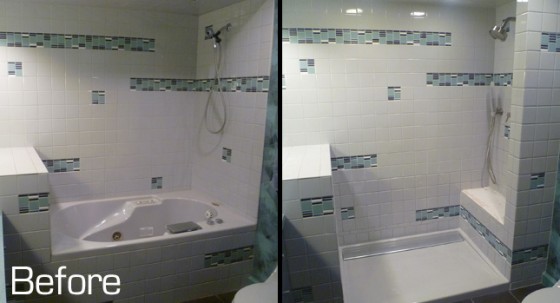
 These homeowners no longer needed a large soaking whirlpool tub. Instead they wanted a shower. The trick was that they liked their tile and wanted to change as little of it as possible. The new shower would need to look like it wasn’t new and blend with the older tile. No small order.
Usually, when clients want to match old tile, I tell them that the result will likely not perfectly match, even if they had the original tiles and grout color. This is because tiles and grout tends to change slightly in color over time just from being exposed to light and water in a shower. What helped this shower is that the client had found a shower base from Kohler, along with tiles that were almost a dead on color match for the old tiles. It was my job to install it and make the dream come to life.
REMOVE THE OLD
The first step was to get the tub out of there. Often I can remove tiles with a small sledge hammer, or by prying them off the wall with a flat bar. Both of these methods are very likely to destroy the substrate, which is expected, but it will also crack or loosen adjacent tiles. If you want to keep some of them you have to be more careful.
This calls for my angle grinder equipped with a 4″ tile-cutting blade. I cut lines about 1/2″ away from the line where I wanted the new tile to end, cutting all the way through the drywall that was behind the tiles. After making the cut, the drywall came off in big chunks. By the way, the angle grinder makes huge dust clouds! If you try this, make sure you’re using a respirator and dust containment, like plastic walls, or you’ll be stuck cleaning the entire house!
After the larger pieces are removed, I carefully removed that last 1/2″ of tile using a small painters tool (or putty knife) to pop them off the drywall. Once the tub was disconnected and freed from the surrounding tile I could get it out, which meant cutting into a couple smaller pieces. I hate to destroy a working tub, but it’s the only way to get it out unless you can destroy the adjacent walls instead.
Here’s the before and after photo:
IN WITH THE NEW
The old shower valve was replaced with a new Kohler set, including a spigot for a handheld shower. I installed the Kohler shower base with linear drain against the wall (Kohler Groove in Ice Grey). I also needed to build a bench and some niches. The bench filled in the extra space left after the tub is removed.
Next, I needed to patch the walls. One important key to matching new tile is that it is flush to the old. Kerdi-board was the perfect product for this because it’s 1/2″ thick and already has the waterproofing membrane attached. If I had used drywall and then applied a Kerdi membrane the walls would be thicker and not match the tile above. Using the Kerdi-board meant that the new tile would be flush with the old and the new tile will be waterproofed. I also installed a new bath fan with a light and patched up the ceiling.
The client had purchased new field tiles for the shower, but the small decorative mosaics were left over from the first installation. She had a large box of pieces and I got to play with them to continue the pattern from the walls. The design is made to look random, but after a close look, you’ll notice that there is a pattern there. It’s just placed somewhat randomly into the design.
I had a blast at this project. It was a challenge, but it was also very satisfying to get to the end and see how well it all came together.


