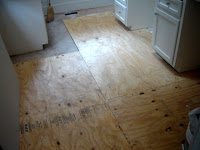
In preparation for laying the Travertine tiles at my Eastwood kitchen project, it became obvious that I would need a more substantial surface to support the stone tiles. The framing was fine, however, there was only 3/4″ decking + 1/4″ sheathing for a total of 1″ of subfloor. So, to strengthen things up I installed another layer of 5/8″ plywood.
 It’s unusually satisfying to put down a new subfloor. (A little weird, I know…
  You can feel the change immediately because the floor is so solid now. It also gives me a clean surface to tile over.
I thought I’d share a couple tips on how to get it to fit well. The first thing is to pick the most square wall and start there. With older homes, like this one, finding something square may be a challenge, but it’s good to get a good start with your first piece.
Taking accurate measurements is the most important part to getting a good fit, especially in smaller spaces where there are lots of notches to make. Thankfully, I got today’s kitchen finished with no ‘do-overs’! Here’s how:
1. Pick a reference point and make all your measurements from the same point. For example if you have a notch to cut around a cabinet, measure both sides of the notch from the end of the piece that it will butt up to. All the measurements must be ‘relative’ to the same end of the board. This is a great tip when measuring drywall as well.
2. Keep the square, factory-cut edges for butting up to adjacent pieces. Cut the other end. This way, all the joints will be crisp and won’t have gaps. Once you allow a gap, the rest of the following joints will suffer as well…
Remember to use some good construction adhesive to help the new plywood to bond well to the old floor. I used PL400 construction adhesive which is great stuff. Also, don’t forget to sweep often. Even a little chip of wood or drywall will make a hump in your new floor and be quite a headache to deal with. This will also help the adhesive to make a good connection.
Stay tuned for travertine!
-Peter


