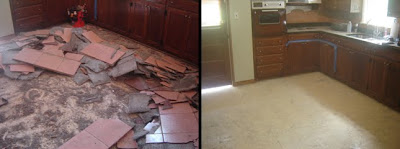
Before we can talk about installing nice new tile, I have to get rid of those pink ones that were (supposedly) stylish a couple decades ago. Let’s talk about how to remove tile:
Removing Tile= Muscle + Elbow Grease 

The difficulty in removing tile depends, of course, on how well it was put down. Sometimes the tiles ‘pop’ up quite easily, at other times they have permanently bonded with the subfloor and will make for a long day.
You’ll need to remove the tiles and any cementboard that may be under them. Often, with a floor, the tiles are directly over plywood or cement. In this case just remove the tile and the mortar and then fill any gouges with self-leveling cement so that you can start with a flat surface for the new flooring.
 For my project, the tiles were installed over Durock cementboard that was nailed down over an old linoleum floor. This was actually fortunate for me because if they had used screws it would have been much more difficult to remove.
The trick for my project, if there was any, was to skip the tiles and work on prying the cementboard up. In doing this, the tiles would often break or pop off anyway. I was able to get by with just a couple pry bars and a hammer. If your project is more stubborn you might consider renting a power chisel or getting a floor scraper to help.

Removing tile makes a TON of dust, especially if you use power tools. Make sure to cover everything that you can to contain the dust. I actually made two temporary plastic walls between the kitchen and the rest of the house to try to contain as much dust as possible. (Use painter’s tape to attach plastic from floor to ceiling. Clamps may help as well.)
Also, you want to find a nice respirator (dust mask), gloves, eye protection, knee pads and even ear plugs. All that pounding will make your ears ring!
The reward for all this hard work is have a nice surface to work from in laying the new tile. Of course, if you can find someone else to do it for you, that’s even better… 

-Peter


