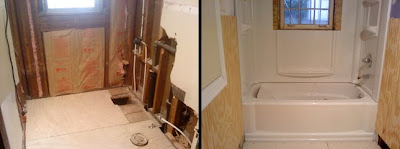
Everything seems a little more difficult when you’re working on an old house. My current project is a 1940’s home full of plaster walls and original trimwork. Nice to look at, but tricky to work with. I guess it’s a good thing that I like a challenge…

PROBLEM 1: WINDOW IN THE SHOWER
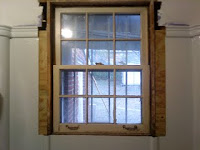
The bathroom was probably not originally designed to include a shower so the window was never a problem. Now, a shower is a requirement, so the question is, “What to do with the window?” There are a few ways to deal with a window in the shower:
1. Remove it completely. This might be easier with a wood-sided house because you could patch the hole. This home is brick, making this a more expensive and difficult option.
2. Replace with glass blocks. This is also expensive and labor-intensive. It’s also tricky if the window hole is not the appropriate size for 8″ glass blocks plus mortar lines. It would be a better solution if the surround was going to be tiled. Irregardless of cost, this is probably my favorite solution in most cases.
3. Replace with an all-vinyl window and vinyl trim. Not a great idea, but probably better than wood. In an older home, it would be expensive to get a window that matched the others. You’d still want to get some kind of frosted glass for privacy, and a plastic curtain might still be a good idea to keep water out of the window sill.
 4. Leave the old window and put a plastic curtain over it. Quick and easy, right?! (And cheap!) This was the solution that this homeowner decided to go with. It would also work okay with the new acrylic surround, except that I’d have to carefully cut a window out of the surround as you can see in the picture. The trim will come right up to the cut and get caulked with waterproof caulk throughout. When we’re finished a small plastic curtain will be installed so that the water will be deflected from the window.
PROBLEM 2: ROOM IS TOO WIDE
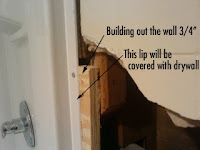
The distance between the original plaster walls was 60″. However, the new tub and surround is supposed to attach directly to the studs. After removing the plaster the space for the tub was 60 3/4″ wide, making the hole 3/4″ too big.
As I told the homeowner, who is a musician, this was a time for some improvisation. 
 The solution that I came up with was to slide the tub to the left. This means that only the right side had a problem. I needed to build it out 3/4″ by attaching some scrap 3/4″ plywood to the studs. I could now install the tub and surround. This worked great, but it meant that I’d now have to cover the entire wall with a layer of 1/2″ drywall to finish out around the surround & tub.
The problems with older homes can normally be solved, but these are the reasons why sometimes it’s just easier to gut the place in the beginning and start over… not that I’m suggesting that or anything…
-Peter


Pingback: Inspired Remodeling & Tile | Nashville, TN | Peter Bales, Contractor | Help! The Shower is Spraying on the Walls!