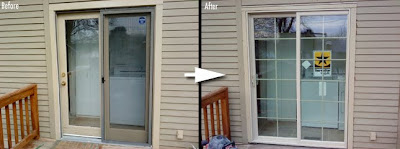
This great home in East Nashville has had quite a few updates including a laundry room on the back of the house. It’s a nice addition complete with glass doors that let it lots of light. The problem is that the door swings into the room and competes with the washer and dryer for space. The old door is also had some water damage over the years.
The homeowner called me to replace the entire thing with a new sliding glass patio door that would seal better to keep out the elements, and not swing into the room when it was opened.

The main issue to consider is the size of the opening. Thankfully, the old doors fit in a 60″ opening and this is a standard size for patio doors.
I started by carefully removing all the trim inside and out to reveal the door jamb. I saved the trim to reinstall around the new door. With the trim off, I could cut around the door jamb with a reciprocal saw to sever the nails and get the entire piece out as a unit. Now I could inspect the framing and see what I was dealing with.
(This is the moment where you have a big hole in the side of your house and you wonder if you really know what you’re doing… 

The new door had a vinyl frame with ‘fins’ that stuck out from all the sides. The fins get attached to the framing to secure the door. For that to work, I needed to have less than a 1/2″ gap around the door, so I added plywood filler where necessary. To get the threshold at a good height to match the tile floor in the laundry room, I also needed to raise the bottom of the door up around 3/4″.

After making sure the door was level, plumb, square, and lookin’ good I shimmed it attached it with screws all the way around.
The next step involves sealing the perimeter of the door with a product called “flexible flashing”. You can get it in rolls of various sizes. It’s used to provide a moisture/vapor barrier around doors and windows. It’s installed over the fins to cover up the screws and make it harder for moisture to get around that door.
Re-installing the trim should be an easy job, however, the new door is hardly ever the exact same dimensions as the old one. Thankfully, the new door was a little bigger, so I could make adjustments to the exterior trim and reuse them. The inside was harder because the patio door wasn’t as thick as the old one. I had to rip a 3/4″ board into 1″ strips to fill around the door and then add casing over that.
Some caulk and paint, and this door is ready for business.
-Peter


