Yesterday, I wrote about how I did the layout for my small set of winder stairs (this post). Now, let’s talk about how I built the treads.
Often, you can build the treads as a series of platforms and then just stack them and secure them in place. I’m going to frame each one individually, frankly, because I didn’t have enough extra plywood to make the platforms… 

Before proceeding too far, of course, I needed to consider the height of each riser. The total rise of my stairs was 26″ so each step would be 6 1/2″ high.
 The risers would be made from 2×8’s and be the frame that supports the 3/4″ plywood treads. To achieve this height I ripped each of the 2×8’s to 6 1/2″, except for the bottom ones that were 5 3/4″. (The bottom of the stairs is always thinner by the thickness of one tread)
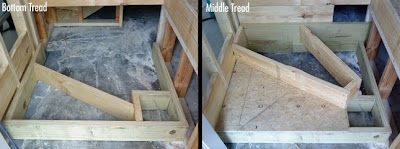
You can see the progression in the pictures as I framed each step from the bottom up.


 One of the more challenging (and fun) parts of this was getting the angles right. Most of the angled cuts were 30 degree miters, with a few 15 degree ones involved with the middle step.
All of these treads are secured to the surrounding framing, with blocking added where necessary to secure everything. The treads are nailed to each frame after on a bead of liquid nails to seal everything together.
Next, I’ll add an interesting handrail…
-Peter


