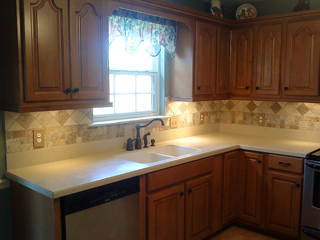
 Sometimes a kitchen can be quite nice and still lack a little ‘wow-factor’. It was time to add some of that to this kitchen with a new tumbled marble backsplash.
The homeowners have great taste and had picked out a handful of various tiles that they liked. We talked over the layout and tried a few combinations before coming up with the final design.
The bottom 6″ features a mosaic pattern made up of various shapes and colors of the stone. Above that I would use 4″ square tumbled marble set on the diagonal. I was excited to get started.
 The backsplash tile can be installed right over the drywall, provided that it is smooth and not damaged. This saved some prep time and I jumped right into getting the layout right. With this many different tiles involved it’s tricky to not end up with small pieces of tile somewhere in the layout.
I laid the tile out on the countertop with spacers to get an idea of the design and measure the actual size of things. Then I installed the mosaic tile all the way around. It actually came on a 12″ x 12″ sheet that I cut in half. The slowest part is always cutting all those pieces that go around the outlets.

With the bottom tiles ready, I started laying out the top tiles on the diagonal. The second row of 4″ tiles would alternate between the natural white and a chocolate-colored tile to add more interest. I wanted this to lay out so that the spacing of the accent tiles would not look awkward.
 I used a sanded grout to finish it up. This is recommended because even though some of the joints are 1/8″ or less many of the spaces are much larger because of the rough, uneven edges of the tiles. I sealed the tiles with two coats of sealer before grouting which is supposed to help the grout not get absorbed into the face of the tiles as much.
In the end, the backsplash looked remarkable and the colors blended perfectly with the maple cabinets and the solid surface counter.


