 Laying out a tile floor is not something you ever want to rush. In the end you want the lines to look good and hopefully land in convenient places. For my recent kitchen and dining room project it got a little more complicated.
The first complication was that the tile was to be installed diagonally. Thankfully, the room was nearly perfectly square (that’s a first). Also, the cabinets came out into the dining room as a peninsula with a section at a 45 degree angle. This would be my reference point for the tile. If my tile doesn’t line up with this peninsula, it will really look incorrect.
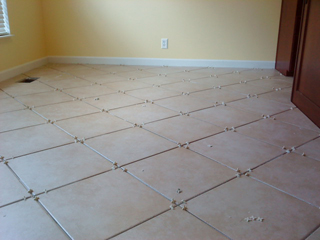
 I started by dry-laying a lot of tile. This helps me check the layout before I commit to it with thinset, but it also makes sense when there are so many cuts to do them all at once and then mortar them down later. You can see in the picture where I started at the peninsula. I put a few pieces down and then measured all the way around the room to figure out how things would end up. There is a large transition between the dining room and living room that where I wanted large pieces, beyond that, I wanted to keep from having any tiny pieces to fool with if possible.
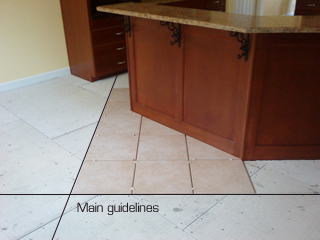
Everything was looking good so far. My main reference line went diagonally across the dining room, parallel with the peninsula. I made the line by measuring an equal distance from either wall and snapping a chalk-line. (Remember that this room is square.) After double checking it I decided that I was on the right track and could proceed.
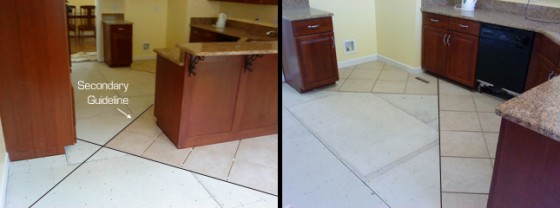
My goal was to extend some reference lines into the kitchen so I could actually start laying tile in there and work my way out through the dining room. As long as my lines were square and my tile followed the lines, this process works fine. You can see in the pictures below how I dry-laid the tile around the peninsula and was then able to make a reference line through the kitchen. I spent several hours cutting tile before I mixed up the mortar. Once I get the thinset out I like to keep going and I’d rather not stop to run out to the garage to cut a piece of tile as much as possible.
The most important part is that your reference lines are correct and that you actually use them. Don’t get excited and spread thinset over your lines and forget they were there! It’s amazing how the slightest deviation will eventually show up in your grout lines as you go along. There is some room to ‘fudge’ but without a good reference point, you won’t know what is right.
I was thrilled with how this layout turned out. The entire room is more than 250 square feet of tile with a lot of that needing to be cut. It was fun to see the finished product and quite gratifying to get to the end and still be square to my guidelines.
Next, I’ll talk about how to approach the transition to the hardwoods in the adjacent living room…


