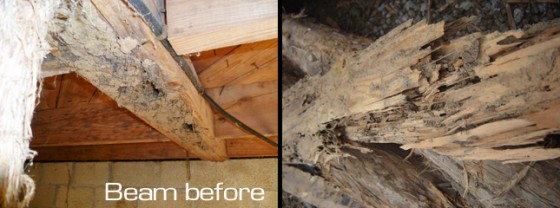
 When termites get into your house they can do some major damage before you ever notice they are there. I’m not an expert on the creatures, but I know they live in the ground and they make little mud tubes up a foundation to get to the lumber that they like to eat. The Ardee project house had been termite lunch for decades and it was time to repair the damage and get it treated so they would stay away.
The termite treatment will be done once the weather warms up to keep them out, but I was able to spend the past week repairing the damage. It’s interesting how they will virtually destroy a specific piece of lumber while leaving another adjacent completely alone. The main areas of damage were along a front part of the house, and one of the two main girders that run under the home. There were also a handful of floor joists that needed work. This was the time to do it because I had already removed much of the old wiring and plumbing that will be replaced later.
The main ways to repair the damage are to either sister a piece or replace it. Sistering refers to attaching a similar piece of lumber alongside a damaged one to reinforce it and carry the load. I did this with many of the floor joists that weren’t completely affected by the termites. It sounds easy, but it can be tricky to slide the lumber in sometimes because you want it to fit tight next to the old joist. Any nails in the way have to be cut out ahead of time. Once it’s in place, you can just tail the two members together.
Replacing pieces can be more difficult. Of course, if the joist has been thoroughly consumed by the termites, then it will be easier to pull it out and insert a new piece. It gets considerably more complex when you have to replace a girder, like I did.
REPLACING A GIRDER
For whatever reason, the termites really liked one of the girders in this house and it needed to be completely replaced. A girder, or beam, is usually made of several large pieces of lumber joined together or “built-up”. In this house it was made up of a doubled 2×8 (likely undersized by today’s standards). Anyway, it carries the load of walls above, and the floor joists rest on it. It is supported by posts or piers that rest on a concrete footer. For all of these reasons, you have to take extra precautions to replace it. My goal was to replace the beam and replace the old cedar posts with new treated 6×6 posts.
1. First I had to build temporary supports to cary the load of the girder. For either side of the beam I ran a long 4×4 supported by jack posts set on a solid concrete block as a temporary footer. The jack posts cost around $50 each at the ol’ Home Depot, but they are nice because you can crank them up and level the floors a little along the way.
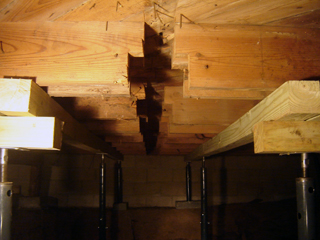
 2. Once the load was carried by the temporary supports I was able to remove the cedar posts and start cutting out the girder. A sawzall (or reciprocating saw) is your friend. I started by cutting all the nails around a particular section and then it would normally come out easily. Cutting the beam into smaller pieces made this go quicker as well. I was removing a small piece at a time, I didn’t try to knock big chunks out all at once. I didn’t want to accidentally affect the integrity of any of the surrounding pieces that were still sound. The picture (above) shows what it looked like once I got the old beam completely removed.
3. The old built-up girder had 2×4 ledgers on either side that added extra support for the joists. Instead of a double 2×8 beam, the new beam would be three 2×8’s. To get it to fit I omitted the ledger on one side and attached all the joists with joist hangers. I installed this new beam one piece at a time, making sure to stagger where the joints landed to make it stronger. The new beam ended up 1/2″ skinnier because modern lumber is not as thick as those used when the house was built. To compensate, I inserted a piece of 1/2″ plywood in the middle of the beam to make it the right overall width and add even more strength.
4. To join all the pieces together and make it one solid beam I also drilled a hole through all the members and joined them with a long carriage bolt every two or three feet or so.
5. Once the beam was done, I cut pressure treated 6×6 posts to fit perfectly under the beam and resting on the existing concrete footers that the old cedar posts had rested on. A sledge hammer was helpful to tap the posts into place and get them plumb.
6. With the new girder finished and posts in place I could now remove all the temporary supports.
This same basic process will be repeated in other sections where I need to repair load-bearing framing.
Call me weird, but I get a kick out of doing this. Only a handful of people will see the basement, but when I’m done, it will be solid and look great, even if it’s 60 years old.
A note about cedar posts: It was interesting to me to see how the termites had even started to weaken the old cedar posts that were holding up this home. The pest control guy told me that they prefer other types of wood, but they would eat the cedar. In this case, they had mainly stayed to the outer parts of each post, while the centers were still quite solid and hadn’t become a serious structural problem- yet. They definitely needed to be replaced. The picture shows how they had deteriorated, both from termites and some moisture damage on the ends.


