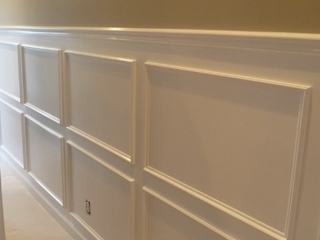
 This week I finished up a job working on a client’s master bedroom. It’s a large room with vaulted ceilings, but lacked the style and luxurious feel that they were wanting. They brought me in to add some wainscoting trim to the bottom third of the room.
Wainscoting was first used on the lower portion of rooms to protect the walls from furniture. Installing it was a process of making the panels piece by piece and assembling them with a host of difficult joints. Today this is very expensive both for the amount of materials involved and the specialized labor that it takes. Thankfully, there’s another way…
With the method I used in this home, the drywall will simulate the wood panels and I’ll just apply the trim to the surface. The first step is to paint the wall where the wainscoting will go. With that done, I installed chair rail moulding across what would be the top edge of our wainscoting. This piece of trim will separate the top and bottom portions of the wall. Sometimes, you can stop here and it already has a dramatic effect, however, for our project we were taking it one step further.
Next I installed the ‘panels’ by making two rows of rectangles out of a small-profile picture-frame moulding. The key to the process is getting the layout right.
LAYOUT TIPS:
1. The margins should all be equal. This includes the distance between the panels and all borders between panels and walls or windows or other obstructions. In our case all the margins are 3 1/2″.
2. It usually ‘feels’ better if the lower panels are a little taller than the upper panels, though you might not even notice it if I didn’t tell you. In our room, the lower panel is one inch taller than the upper.
3. The widths of the panels can vary around the room, however, if there is no interruption they should all be the same. For example, if a wall has no windows or doors that get in the way, it will look best to make all the panels the same size, keeping the margins constant throughout. This changes if the wall has a couple windows, as you see in the picture (left). In this case, start with your margins and then divide what’s left to figure out how many panels will fit. My goal was to have panels between 20-32″, if I needed more than one to fill a space.
4. Next, consider where outlets are or anything else that you’d prefer to work around. In this room there was a large single wall that would get the wainscoting. It had two outlets that I wanted to avoid. I started marking where the panels would land with different numbers of panels until I found a layout that would miss the outlets. If you just have to intersect an outlet, you can miter the moulding and try to make it look as good as possible. Sometimes there’s no way around it!
5. Lastly, if you have a longer stretch of equal-sized panels, start from the center of the space and move out from there. This way if you have to fudge the margins a little, at least the ends should match and be symmetrical.
If you can measure accurately and cut trim at a 45 degree angle, you can probably figure this project out. Take it one panel at a time and they’ll get easier as you start to systematize the process. For our project, I was able to cut all the side pieces at once because they would all be the same. I tried to mass produce as many pieces I can, making sure they all matched.
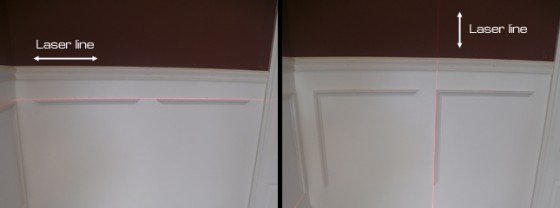
Another very important factor in making the wainscoting look great is getting it level and plumb. A laser level will make this a cinch. Start by setting up your line and installing the chair rail. NOTE: It is likely that your floors and/or your baseboard are not level. You probably won’t be able to measure up in two places and snap a chalk-line. The house I was working in was only a few years old and still, there was more than a half inch difference in the baseboard height as you went across the room. Let the bottom margin absorb this difference while keeping the top and all the panels level.
You can see in the picture how I installed the top panel piece first along my level line and then one of the side pieces. After that, the other two went in quickly, knowing that this first corner was square. The laser level is the key to keeping all the panels the same height and not trailing up or down, even by a little, that might make things look more like a ‘fun house’ at the carnival… You wouldn’t want that, would you? 


L Kim
August 25, 2011 , 4:06 am
John
November 26, 2012 , 1:01 pm