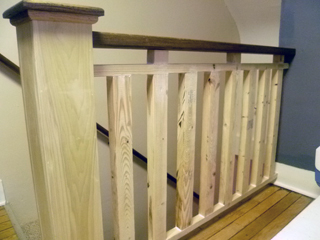
 Sometimes it’s easy to get stuck in a rut and do a banister the same every time. You can go and buy stock pieces off the shelf that will look nice, but it will also look like about every other banister you see out there. These clients wanted something different for their home in the Inglewood neighborhood of Nashville. To find it they went to the Internet and decided on some ideas they found on the Houzz website (watch out, this site will suck you in!). It was my job to make these ideas into a reality.
The difficulty in doing a custom banister like this is that every piece must be made. These are not stock pieces for the most part:
- Oak handrail- made from a rough piece of oak and planed down to around 3 1/2″ by 1 1/2″. I rounded the corners with my router and stained it a color called Jacobean.
- Poplar Newel Post- you can buy a stock poplar newel post, but has some fancier features that weren’t called for in this design. I just wanted a basic poplar box that I could dress up myself.
- Oak Newel Post cap- made from a piece of oak 1×8 board that I also used my router on to round the corners off
- Custom ballusters- all made from basic spruce 2x4s. Not glamorous, but it will all be painted and I needed something thick that I could rip down to size. The horizontal pieces are 1 1/4″ and the vertical ballusters are 2 1/2″ with 3 1/2″ spaces in between
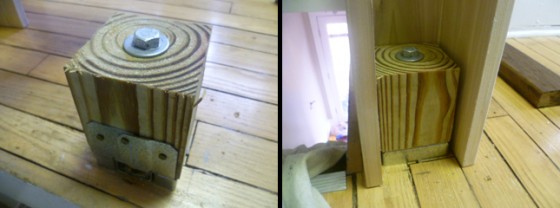
The ballusters were all assembled beforehand and installed as a unit. The handrail and newel post were handled a little differently. I started by figuring out where the newel post would end up. I marked the spot and installed a large 4×4 block that was mounted on a post mount with a 10″ lag bolt down through the middle (above photos). After this is in place, it is a very solid foundation to which I can attached the sides of my newel post. There are various kinds of newel post installation kits out there, but this worked well in this situation.
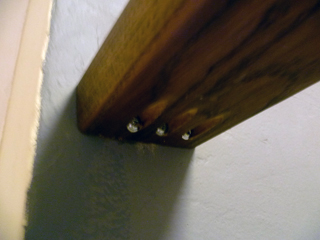
 To attach the handrail, I used a pocket hole jig to drill three pocket holes on the underside of the rail. This worked great and kept all the hardware hidden. I really didn’t want to have any exposed hardware or have to putty any holes in my beautiful oak handrail. I left one side of the newel post off until last so I could install screws from the inside to secure the other end of the banister to the post.
It will only look better once the post and all the ballusters are painted, but it already makes a statement that this isn’t just another run-of-the-mill (boring) banister.


